How to Install an Garbage Disposal Unit 2017
Hi this is your waste disposal specialist and today I’m going to show you how to install an InSink Evolution Compact Garbage Disposal Unit. This is a very Steroid Drogerie high quality and quiet disposal unit.
Tools for the Job
- Electrical Tape
- Slotted Screwdriver
- Wire Nuts
- Plumbers Putty
- Adjustable Pliers
Depending on your Sink Configuration these tools should come in handy:
- Water Hose Clamp
- Dishwasher Drain Connector Kit
- Air Gap
- Drain Tube Extension
- Drain Auger
- Phillips Screwdriver modafinil versus adrafinil hier is waarom u side effects
- Hammer
- Pipe Wrench
- Hacksaw
- Drain Tap
- Clamp Connectors
Removing the Old Waste Disposal Unit
 1. Keep in mind that the hose from the dishwasher goes to the half inch pipe and the hose from the disposal goes to the seven eighths inch pipe. Reach underneath the sink and poke the bottom part of the air gap through the sink making sure the vent hole faces the sink.
2. Now go underneath the sink and tighten down the nut make sure it has a watertight seal. If your sink has already a disposal unit fitted that needs to be replaced it is advised to turn of the main switch at the circuit breaker. Make sure that the disposal unit doesn’t get turned on when switching the unit off.
3. Remove the two three eighths inch nuts from the discharge tube and remove the discharge. You’ll need to loosen up the drainage pipe nut where the discharge tube goes into. Make sure to have a bucket or some cloth material underneath the pipes to catch the excessive water that might be leaking.
4. Loosen the clamp from the dishwasher holes. Remove the dishwasher holes from the disposal but if your sink has an air gap you will be removing the holes that come from the seven eighths inch tube on the air gap.
5. Use a hammer to knock the lower batting ring counter clockwise. Use your hand underneath the disposal to support it and turn the lower mounting ring the rest of the way counterclockwise and the disposal will come off, remember dishwasher hose’s comes with a variety of different sized ends. Cut the end of the dishwasher holes so that the smaller portion can connect to the half inch tube on the air gap.
6. Connect the dish washer hose to the half inch tube on the air gap with a clamp. Now connect a piece of flexible plumbing tubing to the tube of the air gap. Remove the old throat piece assembly from the sink. Sometimes you can reuse the old throat piece but it is always a more professional job if you install the new one.
7. Unscrew the three set screws until the mounting ring and the backup flange are loose. Now with a screwdriver you can remove the snap ring. Get your screwdriver underneath the snap ring and wiggle it till it all comes off.
Installing the Mounting Hardware
1. Now the other parts of the assembly will come obviously. Push the throat piece up through the sink. Clean up the sink so that there is no old plumber’s putty or debris.
2. Loosen the three set screws and use a screwdriver to pry up the snap ring. Now remove the quick collar stopper. Remove the mounting ring. Remove the backup flange and the friction ring.
3. Use a handful of plumbers putty and work it between your palms to make a cigar-shaped length. Wrap the plumbers putty around the flange of the throat piece while using a liberal amount of plumbers putty to ensure a good seal beneath the throat piece.
4. If you have a helper let him/her help hold the throat piece firmly in place while you’re working underneath the sink. If you don’t have a helper use something heavy like the garbage disposal unit
5. Put on the friction ring and the backup flange with the screws of the Manning ring in the Lucent position. Insert the mounting ring and then with a screwdriver install the snap ring on the groove of the throat peace. Keep working at it until you hear the click.
6. Reposition your flash so that it’s right in the middle of the whole. Now tighten each of the three screws in turn like you would tighten the lug nuts on a wheel. Slightly tight each nut one by one until all of them is tight enough. Now clean the excess plumbers putty from around the flange.
Now it’s time to install the Garbage Disposer Unit
 1. It’s more comfortable to use a support underneath the disposal unit when attaching it to the mounting ring. When you have the disposal in position, twist the lower mounting ring that is attached to the disposal clockwise onto the mounting ring of the throat assembly. When you have it attached use a pair of adjustable pliers to squeeze the lower mounting ring clockwise until it is very tight and secure.
2. If you have a dishwasher you will need to remove the drain plug from inside the dishwasher inlet. A big screwdriver and a hammer work just fine. Once you have knocked it out make sure you remove it from the disposal.
3. You may find it easier to remove this drain plug prior to installing the disposal. If you don’t have a dish washer leave the drain plug in place. Now that the drain plug is removed install the hose that goes from the 78 cm portion of the air gap to the dishwasher inlet on the disposal. Cut the hose to length if necessary.
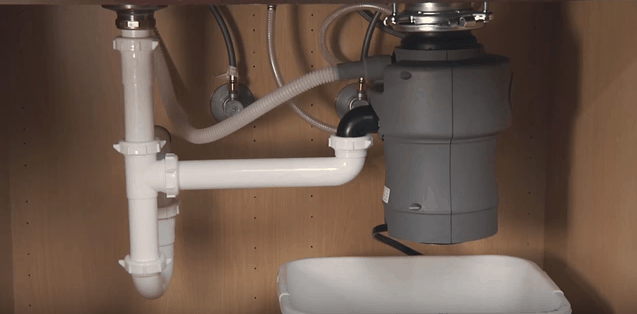
4. Remember to put the clamp on your hose before installing the hose. Push the hose all the way onto the inlet and tighten the clamp. Attach the disposal discharge tube to the anti-vibration tail pipe mount. Attach the drain pipes.
Attach the Electrical Wires
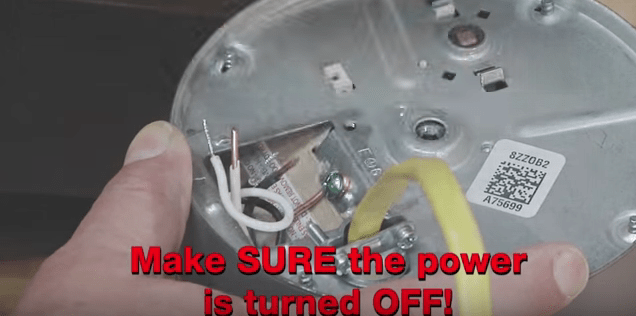 1. Remove the electrical cover panel from the bottom of the disposal. Pull out the electrical wires and use your voltage detector to double check while making sure that the circuit breaker serving the garbage disposal is still off.
2. Now pull the electrical cable through the clamp connector so that the wires come out of the wiring area. If you have a metal armored cable make sure to tight it securely with the metal clamp connector.
3. Attach the white wire from the disposal to the white house wire. Connect the black wire from the disposal to the black wire of the house. If a ground wire was provided it would go to the green terminal. Now put the wires and the connectors into the wiring area and close the cover with the provided screw.
4. Turn the circuit breaker back on. Now turn on the water and then turn on the garbage disposal unit. Thoroughly check underneath the sink for any leaks. Also turn on the dishwasher to make sure it’s draining properly. If there’s no leaks involved when finished installing your InSink Evolution Compact Garbage Disposer you should remember (if you have a dishwasher) that you must knock out the drain plug that goes to the dishwasher.
What is a Waste Disposal Unit?
Congratulations you’ve just installed an garbage disposal unit with no leaks and it works great.